Dark Falls Gildenforum
Willkommen bei den Dark Falls! Erstellt ein kostenloses Benutzerkonto, indem ihr euch Registriert um an unserem Forum und der Community teilzuhaben.
Auto LCD2
- Aufrufe Aufrufe: 76
- Letzte Aktualisierung Letzte Aktualisierung:
-
Overview
Welcome to the Full Guide for my Automatic LCDs 2 script for Space Engineers!
Workshop link:
Automatic LCDs 2
Ein Workshop-Inhalt für Space Engineers
Von: MMaster
Everything you will ever need to know about your ship and station displayed in real time on LCD panels in any vanilla games. modded games and servers! Now with cockpit panels support!
Unfortunately there is not enough space in description of the steam workshop page to fit full guide. Well.. there was, but thanks to your suggestions I added more commands and more cool stuff and it doesn't fit there anymore. So I made this ultimate guide to answer all your questions! ;-)
This guide will give you full insight into how to use all the features of Automatic LCDs 2. You will find out what are the commands, what are the arguments of the commands and how to use them. It also contains full list of all commands with detailed description along with examples of use.
If you didn't watch the basics video guide yet, please do so now to better understand what this guide is about.

Example world
MMaster's Automatic LCDs Example World
Ein Workshop-Inhalt für Space Engineers
Von: MMaster
Small platform with many examples of Automatic LCDs 2. It doesn't contain everything that the script can do, but it gives you some examples.
Basic Terms [READ THIS!]
What is command line?
Command line is line of text representing some command with it's arguments.
Command Argument Argument
What is command?
Command is first word of the command line telling the script what function do you want it to perform.
Command
What are arguments?
Arguments are rest of the words of the command line after the command word.
Argument Argument
What is block?
Block is every machine, button, cockpit, everything on your ship that is accessible through control panel. Armors are not blocks. Script only works with blocks.
Every block has its name that you can set in control panel and main type.
What is block main type?
Block main type is the generic type of the block like assembler, refinery, reactor, solar, door, landinggear, container, .., etc.
For example container corresponds to all small, medium and large containers.
What is item?
Item is everything that can be stored in container. Item has its type and sub-type.
What is item type and sub-type?
Type is main type of item like Ore, Ingot, Component, Ammo and Tool.
Sub-type is the name of the item like Stone, Iron, Steelplate, Construction, .., etc.
One-time setup [READ THIS!]
When you want to start using Automatic LCDs you need to first subscribe to it. Which you probably already did, but just in case here is the link:
Automatic LCDs 2
Ein Workshop-Inhalt für Space Engineers
Von: MMaster
Everything you will ever need to know about your ship and station displayed in real time on LCD panels in any vanilla games. modded games and servers! Now with cockpit panels support!
Note: When you subscribe to this you will not see it in the list of mods in game, because it is not a mod. It is in-game script that works in vanilla game without any mods. So don't worry if you don't see it in list of mods - if you subscribed to it just follow this guide.
Programmable blocks and in-game scripts are now in "Experimental mode" in game that you need to turn on in game options.
Also don't forget to enable in-game scripts in advanced world settings.
1. Load this script into programmable block.
- Open Programmable block control panel
- Click Edit
(If you don't see Edit button you need to Enable in-game scripts in Advanced World settings)
- Click Browse Scripts
- Find Automatic LCDs 2 and select it
- Click Copy to editor
- Click OK.
The initial setup is now complete. You don't need to touch the programmable block anymore.
2. Build a few LCD panels. You can use even Wide LCD or Text panel.
3. Add [LCD] to the end of the name of your panels. (including [] )
German client users: your [LCD] will probably not work. Use !LCD! instead.
4. Use Debug or Monospace font of any size you like on your LCDs.
I highly recommend touching the programmable block now and then to update the script if there were any new features added or bugs fixed. Look at 'How to update' section to learn how to update scripts in your programmable blocks.
Check the steam workshop page regularly or follow my twitter for notifications.
This guide will always be updated.
Next you need to set some commands to those LCDs.
Commands are entered into Custom Datathat you can find in control panel of each LCD.
Commands Guide [READ THIS!]
All commands usually work without entering any arguments unless command description says otherwise.
You can enter one command per line in Custom Data of LCD
Time Base Stats - Time:
Echo
Power
Echo
Cargo
Those lines will display text "Base Stats - Time:" following with current time
Next it will show empty line.
Show power stats
Empty line
Show cargo stats
You can also separate commands on single line with ;
Time Base Stats - Time: ;Echo;Power;Echo;Cargo
This line would do exactly the same thing as the lines above.
You can specify filters and other things by using command arguments. Arguments of each command are explained separately for each command.
Each argument is always just one word - which means everything not separated by space.
+ore,ingot - this is single word
+ore/stone +ingot - two words
First argument usually specifies filter for name of blocks
* means all blocks
Inventory *
This will show all items from all blocks.
Inventory Storage
This will show all items from blocks which have Storage in name.
Inventory [CARGO]
This will show all items from blocks which have [CARGO] (including []) in name.
You can enter multiple words in single argument by using { and }.
I recommend always using { and } even if you use just one word. See below for example.
Inventory {My Cargo Container}
This will show inventory of blocks which have "My Cargo Container" (without quotes) in name. So all of these would be shown: My Cargo Container 1, My Cargo Container A, Second My Cargo Container. Also if you use eg "Container 1" it will show even "Container 10" and "Container 100", etc. You need to chose unique names for your blocks to prevent this.
You can also enter Block Group name instead of blocks name
Inventory {G:Block Group}
This will only show inventory of blocks from group named Block Group (exact name).
Your commands are too long to fit on single line?
You can use a \ to tell the script to continue the command on the next line, just make sure there is nothing after the \ not even a space.
e.g: InvList * +ore/iron, \
silicon, \
magnesium
You don't have { and } on your keyboard?
Try this:
Instead of Alt Gr + 0 use Alt + Strg (Ctrl) + 0 for } and + 7 for {
Same grid blocks filtering
Make sure you read Commands Guide section before this.
As you know almost every command has first argument used for name filtering which can be used to filter blocks by block name or block group name. This name filter now supports more than that. You can use it to tell the script to only look for blocks which are part of the same grid as the one where the programmable block is.
This is very useful if you connect ships to your station or ship and you don't want to see blocks of the connected ships on station LCDs. You can also use this script on multiple ships that connect together without worries that they will conflict once connected.
Script now only updates LCDs which are part of the same grid as programmable block. If you would like to change this please take look at What is LCD_TAG? section to learn how to change LCD_TAG.
What is the grid?
Simplest way to describe the grid is to say that it is single ship. However this is not always true. Blocks connected by pistons, rotors or connectors are not on the same grid!
Blocks connected by merge blocks are part of the same grid. If you connect your ships using merge blocks take a look at section 'How to use with docked ships?'
How to use it?
Usage is very similar to how block groups are filtered. As you know you can filter block groups like this:
Inventory {G:Group name}
You can filter only blocks that are part of the same grid as programmable block running this script like this:
Inventory {T:Block name}
This command would display only inventory of blocks which have 'Block name' in their name and also belong to same grid as programmable block.
How to display all blocks of same grid?
Normally you would use * to display all blocks. This works even with T: modifier:
Inventory T:*
This command displays inventory of all blocks that are part of the same grid as programmable block.
How to display blocks from group that are part of the same grid?
Group modifier G and This grid modifier T can be used together like this:
Inventory {TG:Group name}
This command displays inventory of blocks in group named 'Group name' that belong to same grid as programmable block.
LCDs that are connected using rotors, pistons or connectors are not updating?
By default the script only updates LCDs that are part of the same grid as programmable block.
You can change this behavior by changing LCD_TAG from "T:[LCD]" to "[LCD]".
Look at 'What is LCD_TAG?' section of this guide to learn more about LCD_TAG.
Same construct blocks filtering
Make sure you have read "Same grid blocks filtering" section of this guide.
What is construct?
Construct includes blocks on grids connected by pistons and rotors but NOT by connectors.
How to use it?
Usage is very similar to how same grid blocks are filtered.
You can filter only blocks that are part of the same construct as programmable block running this script like this:
Inventory {C:Block name}
This command would display only inventory of blocks which have 'Block name' in their name and also belong to same construct as programmable block.
How to display all blocks of same construct?
Normally you would use * to display all blocks or T:* to display only blocks of the same grid.
This works even with C: modifier:
Inventory {C:*}
This command displays inventory of all blocks that are part of the same construct as programmable block.
How to display blocks from group that are part of the same construct?
Group modifier G and construct modifier C can be used together like this:
Inventory {CG:Group name}
This command displays inventory of blocks in group named 'Group name' that belong to same construct as programmable block.
What is LCD_TAG?
LCD_TAG is used to tell the script which LCDs are managed by the script. As all of you know the script looks for LCDs that have [LCD] in their name by default.
This is because the LCD_TAG is set to "T:[LCD]" by default which means that it will look for LCDs on the same grid with [LCD] in their name.
You can however change this to whatever you like. You can tell the script to manage LCDs in certain group or even tell it to manage all LCDs regardless of name.
How to change the LCD_TAG?
You can change the LCD_TAG by editing the Custom Data of programmable block that runs the script. Let's explain it by example:
You have LCDs connected using rotors and you want them to be managed by the script.
1. Open control panel of programmable block that contains Automatic LCDs 2
2. Click on Custom Data
3. Write following line to Custom Data:
LCD_TAG = [LCD]
4. Click Ok
5. Click Recompile button in Programmable Block control panel
6. Script will now update all panels containing [LCD] even on connected grids
If you don't understand why it now looks even on connected grids please read the 'Same grid filtering' section of this guide.
Note: If you already use Custom Data to display stuff on Programmable block screens (check 'How to use with cockpits?' section of the guide to understand how):
Add the line to the beginning of Custom Data and separate it from the commands by using line --- eg:
LCD_TAG = [LCD]
---
@0 AutoLCD
Echo "Text on main screen"
@1 AutoLCD
Echo "Text on keyboard screen"
How to tell the script to manage all LCDs regardless of name?
LCD_TAG follows the same name filtering rules as commands. So you can set the Custom Data to:
LCD_TAG = *
and the script will manage completely all LCDs on all connected grids.
How to tell the script to manage all LCDs in group?
Same as with name filtering, you can set the Custom Data to:
LCD_TAG = G:Group name
WARNING
Do not chose tags containing other tags!
BAD:
First Programmable Block: LCD_TAG = "Bridge [LCD]"
Second Programmable Block: LCD_TAG = "[LCD]
GOOD:
First Programmable Block: LCD_TAG = "[Bridge LCD]"
Second Programmable Block: LCD_TAG = "[LCD]
You also can't change the LCD_TAG during run. You need to recompile the script every time you change the LCD_TAG otherwise the script will still look for old tag.
How to set LCD_TAG and show stuff on the Programmable block screen?
You need to separate the LCD_TAG in the Custom Data from the commands by using 3 dashes (---) on single line like this:
LCD_TAG = [My LCD]
---
@0 AutoLCD
Echo Text on PB screen
Joining LCDs together
It is now possible to join multiple LCDs together so they will look and work like single panel. Because of the limitations of text alignment it is only possible to join LCDs up and down. Not left to right. So the widest LCD you can have is Wide LCD. But you can have many of them under each other to form single big one.
You can do that by adding !LINK:GROUP NUMBER to the name of the LCD. Where:
GROUP is your custom name for this group of LCDs. It has nothing to do with ingame groups of blocks. Just make up some name.
NUMBER is position of LCD in array of LCDs. It doesn't matter what number you choose. They just need to go one after another. So the topmost LCD will have the lowest number. For example 1. LCD under it will have 2, etc.
!LINK needs to be in capital letters and there needs to be space between GROUP name and NUMBER.
The command line will be taken from first LCD in group.
All joined LCDs will be automatically set to the same font as the first LCD in group.
Example
You have 3 LCDs under each other.
Call the top LCD "Text panel [LCD] !LINK:A 1"
Call the middle one "Text Panel [LCD] !LINK:A 2"
and last one "Text Panel [LCD] !LINK:A 3"
You can have another group of LCDs joined and you just need to change the group from A to for example B.
How to use with cockpits?
You can use this script on cockpit screens as well as screens of other blocks. In order to do that you have to mark the cockpit (or other block) with the LCD_TAG as you did with LCDs. So by default you add [LCD] to the name of the cockpit in order for the cockpit to be recognized by the script.
As soon as you do that the first screen on the cockpit will be controlled by the Automatic LCDs 2 and should display the usual message that you should write commands to custom data of the panel. If you need only this screen, you can write commands to Custom Data of the cockpit just as you do with LCDs.
In order to use other screens you have to tell the script which screen you want to write to. Here is example of how the Custom Data of cockpit can look like:
@0 AutoLCD
Echo This will be shown on first screen
@1 AutoLCD
Echo This will be shown on second screen
@2 AutoLCD
Echo This will be shown on third screen
As you can see there are special headers telling the script which screen you want to write to. They need to be on their own separate line.
Header looks like this:
@<screen index> AutoLCD
Where <screen index> is the index of the screen you want to write to. 0 is the first screen, 1 is the second screen, etc. The 'AutoLCD' part just needs to be there.
Easy way to know the index of the screen is when you look at the control panel of the cockpit, find the list of the LCD panels and pick one. For example 'Keyboard' screen is 4th in the list of the LCD panels which means its index is 3 (because first one is 0). So if you would want to write only to the Keyboard screen your custom data would look like this:
@3 AutoLCD
Echo This text will be on keyboard
Echo other screens won't be changed
You can use this on any block that has LCD panel screens. Script will not touch screens that you haven't specified so you can use this with other scripts too. Read 'Compatibility with other scripts' if you want to know how Automatic LCDs can share Custom Data with other scripts.
Unfortunately you are not able to use manual scrolling or panel linking on those screens.
How to set LCD_TAG and show stuff on the Programmable block screen?
You need to separate the LCD_TAG in the Custom Data from the commands by using 3 dashes (---) on single line like this:
LCD_TAG = [My LCD]
---
@0 AutoLCD
Echo Text on PB screen
How to use with docked ships?
If you want to dock or merge a ship that is using this script with another ship or station that is also using this script you can run into some problems which can be easily prevented if you know how.
Script now only updates LCDs which are part of the same grid
This means that LCDs which are connected using connectors, pistons or rotors will not be updated to prevent conflicts between docked ships. This does not apply when ships are connected using merge block because in that case they behave like single ship in game.
LCDs are updating much slower when more ships are docked using merge block
If there are more ships using this script docked together using merge block then the programmable blocks will not split the work efficently automatically.
I recommend using different LCD_TAG for each ship and station. Look at Tips and Tricks section of this guide to learn how to do that. This will ensure that programmable blocks always update only LCDs on the ship/station they are intended for.
LCDs are showing items, power, cargo, etc of all docked ships
This will happen if you use no arguments to commands or if you use * or if you use same names for groups / blocks on both ships. Make sure you read Same ship blocks filtering section to learn how to filter only blocks of the same ship.
Keep in mind that the same ship filtering doesn't work if the ships are connected using merge block.
I recommend making groups of blocks named based on ship they are on and always using group filtering in commands.
Example:
Ship named ALICE
- uses LCD_TAG = "[ALICE LCD]";
- has all storage blocks in group "ALICE Storage"
- has all power blocks in group "ALICE Power"
- has 1 LCD named "LCD Power [ALICE LCD]" with command "Power {G:ALICE Power}"
- has 1 LCD named "LCD Cargo [ALICE LCD]" with command "Cargo {G:ALICE Storage};Inventory {G:ALICE Storage}"
If you follow this convention for all your ships and stations then you should have no problems with docking or merging ships together. Never use * or no argument if you plan to dock the ship and you don't want to see things from other ships when docked.
How to update?
Script cannot update itself inside your programmable blocks. You need to load new version of script to your programmable block to overwrite the old one. You can do that in exactly the same way as when you first loaded the script into programmable block.
Make sure that you use Automatic LCDs 2 script to get all new features!
Open your programmable block, click Edit, click Browse Workshop, select Automatic LCDs 2, click OK, Check code, Click Ok. Done. Your script is now updated.
Note: If you are experiencing errors on translated version of script please write to the script page of author of that translation. I can't update translations.
Command: Inventory
Displays inventory summary for certain item types. It automatically adds 0 items lines for vanilla game items. Script will automatically display even modded items if they are in the inventories, but it will not report missing modded items.
If you don't want to display missing items (0 items lines) use InventoryX instead of Inventory (good for displaying contents of container). This will also disregard default quotas so unless you set quota yourself it will be 0 and no visual bar will be shown.
If you don't want to display ore counts in ingot display use InventoryS or InventoryXS if you also want to hide 0 items lines.
This command has some default quotas set for vanilla items. It's quota is considered maximum quota which means that this is the maximum number of items you ever expect to have. So you can easily see just by looking at the progress bar around how many items you have.
It also reports modded items found in inventories, but it will not show those if you don't have any in inventories.
You can completely disable progress bar by setting the quota to 0.
You can also use InventoryNB (no bars) variant to hide all progress bars.
InventoryNN (no numbers) hides all numbers.
InventoryNNB (no numbers or bars) hides all numbers and bars.
This also works with other variants (like InventoryXNNB).
Advanced: If you know something about how items in SE internals work, you can translate or add modded items to be reported when 0 of them is in the inventory. Look into Modded Items discussion on the Steam Workshop page for more info.
Arguments
No arguments: displays all items on current ship/station.
First argument: filters blocks based on name - look into Command Guide section for more info.
Next arguments: specify included/excluded item types and can override default quotas.
Item type and quota specification:
Operator + or - adds or removes items from display.
+all adds all item types to display
-ore removes ores from display
You need to add something for - operator to work!
Use main types in specification:
ore (all ores)
ingot (all ingots)
component (all components)
ammo (all ammo boxes)
tool (all tools + hand guns)
Or sub types:
(both ore and ingot)
iron, gold, nickel, platinum, cobalt, magnesium, silicon, silver, uranium
(ore) ice
(ingot) scrap
(component)
construction, metalgrid, interiorplate, steelplate, girder, smalltube, largetube, motor, display, bpglass, computer, reactor, thruster, gravgen, medical, radio, detector, explosives, solarcell, powercell, superconductor, canvas, engineerplushie, sabiroidplushie
(tool)
s-10, s-10e, s-20a, mr-20, mr-8p, mr-50a, mr-30e, ro-1, pro-1, welderitem, welder2item, welder3item, welder4item
anglegrinderitem, anglegrinder2item, anglegrinder3item, anglegrinder4item
handdrillitem, handdrill2item, handdrill3item, handdrill4item
(ammo) 5.56x45mm s-10mag s-10emag s-20amag mr-20mag mr-8pmag mr-50amag mr-30emag gatlingammo rockets autocannonmag assaultcannonshell srailgunsabot lrailgunsabot artilleryshell
(oxygen) oxygenbottle
(gas) hydrogenbottle
(physicalobject) spacecredit
You can use modded items names usually found out by removing spaces from what the display shows in all items summary.
So for example: Super_Mega Large Bullet would be super_megalargebullet
Or both:
ingot/iron (only iron ingots), ingot/uranium (only processed uranium)
You can combine that like this:
+ingot/iron,gold (add iron and gold ingots)
+ingot,component (add ingots and components)
+steelplate,construction (steelplates and construction components)
To override progress bar quotas:
+ingot:10000
Adds all ingots with all of them having max progress bar value 10000.
+component:1000 +steelplate:10000,construction:9000
Adds all components with quota 1000
Next it overrides steelplate and construction components with different quotas.
Examples
Inventory * +all -ore
Inventory Cargo +ingot -scrap
Inventory {Red Storage} +ingot:300000
Inventory [STORAGE] +component
Inventory {Cargo Container} +all -tool -ammo
Inventory {Large Cargo Container 3} +ingot:1000 +component:50
Inventory {Oxygen Storage} +oxygen:100
Command: InvList
This command is exactly the same as Inventory, but it doesn't display items categories.
You can use InvListX to remove 0 items lines just like in Inventory command.
If you don't want to display ore counts in ingot display use InvListS or InvListXS if you also want to hide 0 items lines.
You can also use InvListNB (no bars) variant to hide all progress bars.
InvListNN (no numbers) hides all numbers.
InvListNNB (no numbers or bars) hides all numbers and bars.
This also works with other variants (like InvListXNNB).
Examples
InvList * +all -ore
InvListS * +ingot
InvListNB Cargo +ingot -scrap
InvListX {Red Storage} +ingot:300000
InvListX [STORAGE] +component
InvListX {Cargo Container} +all -tool -ammo
InvListXS {Large Cargo Container 3} +ingot:1000 +component:50
InvList {Oxygen Storage} +oxygen:100
Command: Missing [New MissingList]
Displays items which are low in stock (lower than set quota).
This works almost the same as Inventory command, but it shows only items which are lower than set quota.
This quota is different from the Inventory command quota, because it is minimum quota. You can use this command to only show items which are very low in stock so just by looking at it you will see what needs your immediate attention. That is why default quota is set to 1 so only when you have 0 items they will show up there - which I think almost always needs your immediate attention.
Usage of the command is exactly the same as Inventory command and you can override the quotas in the same way.
You can also use MissingList variant to remove the lines with category names.
You can also use MissingNB (no bars) variant to hide all progress bars.
MissingNN (no numbers) hides all numbers.
MissingNNB (no numbers or bars) hides all numbers and bars.
This also works with other variants (like MissingListNNB).
Examples
Missing * +component:50 +ingot:100 +ammo:10
Missing {Resource Storage} +ore:2000
Command: Cargo
Displays used cargo space of specified cargo containers. Only from cargo containers.
Use CargoX to show only percentage without the progress bars or actual volume.
Use CargoP to show only percentage and progress bars without exact volume.
Use CargoBar to show only progress bar with no text.
Note: doesn't work with drills and any other blocks other than containers. Use CargoAll command to show cargo of all blocks.
Arguments
No arguments: all containers on ship/station
First argument: filters containers based on name
Examples
Cargo
Cargo Storage
Cargo {Large Cargo Container 5}
Command: CargoAll
Displays used cargo space of specified blocks. All blocks including cargo containers, refineries input, assemblers input, reactors, welders, .. etc.
Use CargoAllX to show only percentage without the progress bars or actual volume.
Use CargoAllP to show only percentage and progress bars without exact volume.
Use CargoAllBar to show only progress bar with no text.
Usage is exactly the same as Cargo.
Command: Power
Displays power statistics for specified blocks.
Automatically separates reactors, engines, solar panels, wind turbines and batteries. Works with modded blocks. It shows maximum achievable power output for solar panels. That means that if there is no sun shining on solar panels then the maximum is 0 W.
Use PowerX to show simple variant with only percentage and no progress bars.
Use PowerP to show only percentage and progress bars without exact power readings.
Use PowerV to show only exact power values, but no percentage and progress bars.
Use PowerIn to show only input of batteries and PowerOut to show only output of batteries. Variants PowerInX, PowerOutX and PowerInP and PowerOutP work too.
Custom Titles
This command by default writes "Reactors:", "Engines:", "Turbines:", "Batteries:" and "Solars:" in the output. Now you can override that by using second argument like this:
To display only power blocks from group Batteries with title "My Accumulators:"
Power {G:Batteries} {My Accumulators}
Note that you need to enclose the second argument in {}.
Arguments
No arguments: all reactors, engines, wind turbines, solars and batteries
First argument: filters blocks based on name
Second argument: override titles (Reactors, Engines, Turbines, Solars, Batteries) with your custom text
Examples
Power
Power {Small Reactor}
Power {Large Reactor}
Power {Battery 2}
Power {Main Power}
Command: PowerStored
Displays power charge (stored power) of battery.
Use PowerStoredX to show simple variant with only percentage and no progress bar.
Use PowerStoredP to show only percentage and progress bars without exact power readings.
Use PowerStoredV to show only exact power values, but no percentage and progress bars.
Arguments
No arguments: all batteries
First argument: filters blocks based on name
Second argument: override titles (Reactors, Solar, Batteries) with your custom text (read Custom Titles in Power command description to understand how it works)
Examples
PowerStored
PowerStored {Main Battery}
Command: PowerSummary
Displays total power output for specified blocks.
Use PowerSummaryX to show simple variant with only percentage and no progress bar.
Use PowerSummaryP to show only percentage and progress bars without exact power readings.
Use PowerSummaryV to show only exact power values, but no percentage and progress bars.
Arguments
No arguments: all reactors, solars and batteries
First argument: filters blocks based on name
Examples
PowerSummary
PowerSummary {Small Reactor}
Command: PowerUsed & PowerUsedTop
Displays power usage of specified blocks.
PowerUsedTop variant shows top X blocks from the specified blocks sorted by power usage.
Arguments
No arguments: displays power usage of all blocks
First argument: filters blocks based on name
Second argument: number of blocks to display (only works for PowerUsedTop)
NOTE (Bug): the game reports power usage of all thrusters on single thruster and all other thrusters report no power use - because of this it is not possible to separate thrusters and all of them except for one will report 0 power use and that single thruster will report power usage of all thrusters.
Examples
Power use of refineries:
PowerUsed {Refinery}
Top 5 most power using blocks on ship:
PowerUsedTop {T:*} 5
Top 10 most power using blocks on ship and connected ships:
PowerUsedTop * 10
Command: PowerTime
Displays estimated time after which power will be depleted. You can also filter blocks by using name filter to limit the estimation to only some blocks. For example you may be interested in seeing only batteries on your ship and this command will show you time after which those batteries will be depleted at current power draw rate or time after which the batteries will be fully charged.
It doesn't work with Hydrogen Engines, because the calculations required to calculate time until hydrogen depletion are really complicated and unfortunately they also require a lot of code to be added which currently doesn't fit into the programmable block limits. I'm sorry about that.
You can set your own time quota and this command will even display progress bar with percentage showing how much remaining power time there is out of your total specified quota.
Make sure you own all the reactors and batters as well as programmable block or it will not work correctly!
NOTE: in-game scripts have very limitted access to things which are needed to estimate power time. I've done everything I could think of to estimate the time with as much precision as possible, but it is not perfect. It is just an estimation. On the other side, during my testing I found it to be more precise than the Fuel Time displayed on game HUD in some situations.
Use PowerTimeX to show simple variant with only percentage and no progress bars.
Use PowerTimeP to show only percentage and progress bars without exact time.
Use PowerTimeBar to show only progress bar with no text.
Note: These commands (PowerTimeX, PowerTimeP and PowerTimeBar) only work if you specify time quota.
Arguments
No arguments: displays power time of the ship without any progress bar
First argument: filters blocks based on name or group
Second argument: time quota hours
Third argument: time quota minutes
Forth argument: time quota seconds
Examples
Power time of whole ship:
PowerTime
Power time of whole ship with time quota 5 days (120 hours):
PowerTime * 120
Power time of group Batteries (showing either charge time or depleted time):
PowerTime {G:Batteries}
Power time of all blocks that have Reactor in name with quota set to 1hour 30minutes:
PowerTime Reactor 1 30
Power time of battery with deplete/charge time quota set to 45 seconds:
PowerTime {Battery 31} 0 0 45
Command: Charge
Displays jump drive charge with progress bar for every jump drive matching name/group filter.
You can use ChargeX to display only percentage without actual values or progress bars.
Use ChargeBar to show only progress bars with no text.
Use ChargeSum variant (also ChargeSumX and ChargeSumBar) to show single entry for all jump drives matching the name filter.
Arguments
No arguments: nothing will be displayed!
First argument: filters jump drives based on name or group
Second argument: text to display for ChargeSum entry (instead of usual jump drive name)
Examples
Charge
Charge {My Jump Drive}
Charge {G:Jump Drives 1}
ChargeSum {Jump Drive} {Jump Drives Charge}
Command: ChargeTime
Displays estimated time remaining to charge jump drive with progress bar for every jump drive matching name/group filter.
Note: This is just estimated time by script. It will probably not be exactly correct and it is possible that it will jump up and down, because of how in-game scripting works and because of the fact that the game doesn't expose such information without dirty hacks and the script has to calculate it itself.
You can use ChargeTimeX to display only time without progress bars.
Use ChargeSumTime variant (also ChargeSumTimeX) to show single entry (longest charge time) for all jump drives matching the name filter.
Arguments
No arguments: nothing will be displayed!
First argument: filters jump drives based on name or group
Second argument: text to display for ChargeSumTime entry (instead of usual jump drive name)
Examples
ChargeTime
ChargeTime {My Jump Drive}
ChargeTime {G:Jump Drives 1}
ChargeSumTime {Jump Drive} {Full Charge Time}
Command: Damage
Displays damaged and partially built ship/station blocks. Script only has access to blocks which are visible in control panel so no armor blocks, conveyor tubes, etc are considered.
You can use DamageX command to show only percentage without the hull numbers.
You can now also use word NoC (No Contruction) which will make Damage commands display only damaged blocks and not show blocks that were grinded / not fully constructed.
You can also use DamageC to only show only blocks that are not fully constructed.
Possible variants: DamageNoC, DamageXNoC, DamageC and DamageXC
Arguments
No arguments: all blocks on ship/station
First argument: filters blocks based on name
Second argument: maximum percentage to show eg: Damage * 30 will show only blocks that have less than 30% of integrity
Examples
Damage
Damage {Large Thruster}
Damage [IMPORTANT]
Damage {Reactor} 50
Command: Docked
Displays list of names of docked ships on specified connectors.
Doesn't show connectors that are not connected unless you use DockedE variant in which case it will show "-" when the connector is not connected to anything.
You can also make it show connectors to which the ships are connected if you use DockedCN which you can also combine with empty connectors variant as DockedCNE.
WARNING: You should definitely use same grid filtering like {T:*} (look for the 'Same grid filtering' section above), otherwise as soon as other ships connect you will also see their connectors connection!
Arguments
No arguments: shows list of all docked ships
First argument: filters connectors based on name and only shows ships connected to those
Examples
Docked {T:*}
Docked {T:Connector 1}
DockedCNE {TG ock Connectors Group}
Command: BlockCount
Displays number of blocks of specified type
Separates different sub types of blocks
Arguments
No arguments: displays all blocks
First argument: filters blocks based on name, displays blocks of all types.
Next arguments: filter blocks based on type
Use main block type name like:
reactor, thruster, container, refinery, assembler, solar, battery, beacon, antenna, gyro, sensor, connector, spotlight, interlight, landgear, program, timer, rotor, piston, projector, merge, sound, collector, door, spheregrav, gravgen, drill, grinder, welder, gatlingturret, missileturret, interiorturret, gatlinggun, reloadlauncher, launcher, mass, warhead, light, control, cockpit, medi, remote, button, camera, detector, laserantenna, airvent, oxygenerator, sorter, oxyfarm, cryo, jumpdrive, tank (both hydrogen and oxygen), parachute, windturbine, hydrogenengine
Hangar door uses same type as door so you will have to filter those by name if you want to have them separately.
Types separated by space or ,
Example:
BlockCount * reactor
BlockCount [BACKUP] reactor
BlockCount * refinery,assembler
BlockCount * thruster gyro reactor,solar,battery
Command: EnabledCount
Displays number of enabled blocks of specified type.
Separates different sub types of blocks.
Arguments
No arguments: displays all blocks
First argument: filters blocks based on name, displays blocks of all types.
Next arguments: filter blocks based on type (look at BlockCount command for list of types).
Examples
EnabledCount * reactor
EnabledCount * assembler
Command: ProdCount
Displays number of producing blocks of specified type.
Arguments
No arguments: displays all blocks
First argument: filters blocks based on name, displays blocks of all types.
Next arguments: filter blocks based on type (look at BlockCount command for list of types).
Example
ProdCount * refinery,assembler
Command: Working
Displays all blocks of specified type showing their working state.
State is one of ON/OFF, IDLE/WORK, LOCK/UNLOCK/READY, OPEN/CLOSED and laser antenna states.
If you use group of multiple blocks and you want to have just one line showing the status, filter only single block from the group of blocks. So single door instead of whole group of doors or just one specific thruster from group of thrusters, etc.
It may not work for some localized games, but working command for battery now shows batteries charge state as (+) 100.0% or (-) 55.5% .. (+) meaning battery is charging (-) meaning its not charging. The number of percent is portion of full capacity filled.
Arguments
No arguments: displays all blocks
First argument: filters blocks based on name, displays blocks of all types.
Next arguments: filter blocks based on type (look at BlockCount command for list of types).
You can filter states like this:
Working * assembler:work reactorn
If you want to filter state of all block types you can do it like this:
Working * :workn
Notice that there is no type specified just :state
You can use WorkingX to filter states based only on ON/OFF state:
WorkingX * assemblern
This will show all assemblers that are ON (does not matter if IDLE or WORK)
Examples
Working * missileturret,gatlingturret,interturret
Working * refineryff refinery:idle refinery:work
Working * doorpen
Working {G:Main Assemblers} assembler:idle assemblerff
Working Red refinery,assembler
Working * battery
Command: PropBool (NEW!)
Shows boolean properties of blocks. You can cusomize the text displayed when the property is true or false.
Boolean properties are properties that can have just one of 2 values - true or false.
Like On/Off, Open/Closed, Handbrake, Collect All, etc etc.
You can find list of all properties on wiki by awesome Malware:
https://github.com/malware-dev/MDK-SE/wiki/List-Of-Terminal-Properties-and-Actions
Look only for properties that are of Type bool.
Eg: OnOff, Open, ShowOnHUD, Depressurize, slaveMode, UseConveyor, ControlThrusters, ControlWheels, DampenersOverride, HandBrake, HorizonIndicator, MainCockpit, DrainAll, AnyoneCanUse, Force weld, ShareInertiaTensor, Override, Autolock, EnableIdleMovement, Shoot, TargetCharacter, TargetLargeShips, TargetMeteors, TargetMissiles, TargetNeutrals, TargetSmallShips, TargetStations, isPerm, SetFaction, TakeOwnership, Auto-Refill, Stockpile, AutoDeploy, etc.
They are case sensitive! Make sure you enter them exactly without any spaces before or after them. e.g. use {AutoDeploy} not {Auto Deploy} nor { AutoDeploy } nor {autodeploy}.
All of them should be self explanatory and always correspond to one of the properties you can see in the block control panel.
There are a lot of properties for many different blocks and listing them all here along with what they do would take a lot of space so I'm leaving that up to you to try.
Mods may also add their own bool properties which you can use here too.
There are 2 variants of this command:
1. PropBool {block name} {PropertyName} {Text before value} {true text} {false text}
- displays bool property PropertyName of first found block with block name like this:
if property is true it will show: Text before value true text
if property is false it will show: Text before value false text
Arguments
First argument: name filter
Second argument: property name (eg. Handbrake)
Third argument: text on the left side of screen
Fourth argument: text on the right side of screen show when property is true
Fifth argument: text on the right side of screen show when property is false
Examples
PropBool {Cockpit 1} {HandBrake} {Handbrake} {On} {Off}
- displays "Handbrake On" if handbrake is enabled on Cockpit 1
PropBool {Door 1} {Open} {Door status:} {Open} {Closed}
- displays "Door status: Open" if Door 1 is open; "Door status: Closed" if Door 1 is closed
PropBool {Connector 3} {CollectAll} {Connector 3 is set to } {Collect All} {Don't Collect}
- displays "Connector 3 is set to Collect All" if its set to Collect All otherwise it displays "Connector 3 is set to Don't Collect
2. PropsBool {blocks name} {PropertyName} {true text} {false text}
- displays bool property PropertyName of multiple blocks (showing block names on left side) like this:
Blocks name 1 true text
Blocks name 2 false text
Blocks name 3 false text
Arguments
First argument: name filter
Second argument: property name (eg. Handbrake)
Third argument: text on the right side of screen show when property is true
Fourth argument: text on the right side of screen show when property is false
Examples
PropsBool {Assembler} {OnOff} {Enabled} {Disabled}
- displays all assemblers that contain "Assembler" in their name with "Enabled" or "Disabled" on the right depending if they are On or Off.
PropsBool {Door} {Open} {Open} {Closed}
- displays all doors that contain "Door" in their name with Open or Closed on the right depending on if they are open or not
PropsBool {Turret} {Shoot} {Fire at Will} {Hold Fire}
- displays all turrets with "Turret" in their name with "Fire at Will" or "Hold Fire" on the right depending on if turret is set to Shoot or not
Command: Details
Displays details text from control panel for every block matching name/group filter.
For example: Projector details showing needed parts.
Details command can also start output on line where the user specified text is found.
DetailsX variant can be used to skip first line which should be the "Type: " line
DetailsNoN variant hides the names of blocks. (can also be used as DetailsNoNX)
Arguments
No arguments: nothing will be displayed!
First argument: filters blocks based on name or group
Second argument: text to look for in details text
Third argument: number of lines to display per block / text that will end output per block
Projectors now update automatically!
Due to game limitations some blocks do NOT automatically update the details text until you look at them in control panel. This is VERY important as you always need to look at the block in control panel if you want the LCD to show updated text. This does not apply to all blocks!
Open control panel on your ship / station, find your block and click on it. Thats all.
You need to do this every time you want to update the text on LCD.
Examples
Details {Projector 2}
Details {G:Batteries}
DetailsX Reactor
How to use second argument
Details {My block} {Text to look for:}
The command above will get the details text from block My Block and if it finds "Text to look for:" in the details text it will display it and any text after that otherwise if the text is not found the output will be empty.
How to use third argument
Details {My block} {Text to look for:} 2
The command above will get the details text from block My Block and if it finds "Text to look for:" in the details text it will display it and any text after that until it displays 2 lines, it will not display any line after that (for that block).
Details {My block} {Text to look for:} {Text to stop}
The command above will get the details text from block My Block and if it finds "Text to look for:" in the details text it will display it and any text after that until it finds line that contains "Text to stop" - it will NOT display this line or any line after it (for that block).
Command: Amount
Displays list of all blocks with number of items / max number of items that fit inventory.
Usable for all blocks that take just single type of item like weapons, reactors & oxygen generator.
Automatically figures out maximum number of items. Works with modded weapons / ammo.
If it is used on inventory containing more items it will not show correct numbers!
Use AmountX to hide progress bars.
Use AmountBar to show only progress bars with no text.
For example for Missile Turret with 2 missiles loaded it would show:
Missile Turret 2/6 (with default inventory size)
or
Gatling Turret 15/24 (note that only 23 ammo fits to gatling turret even when there is enough space to fit 24 - probably game bug)
Usage is similar to BlockCount & Working command.
Arguments
No arguments: displays all turrets, guns, reactors and oxygen generators list
First argument: name filter
Next arguments: filters blocks based on type like in BlockCount command
Examples
Amount {G:Weapons} launcher,gatlinggun
Amount {Small Reactor} reactor
AmountX {G:Turrets} missileturret,gatlingturret
Command: Oxygen
DIsplays pressure of specified Air Vents, average output of Oxygen Farms and average fullness of Oxygen Tanks.
Note: If you would like to display only leaking air vents you can use Working command and filter only LCDs that show LEAK using filtering described in Working command.
Arguments
No arguments: all air vents, oxygen farms and oxygen tanks
First argument: filters blocks based on name
Examples
Oxygen
Oxygen Vent
Oxygen {Oxygen Tank}
Oxygen {Oxygen Farm}
Oxygen {G:Oxygen Room}
Command: Tanks
Shows fullness of tanks (and hydrogen engines when keen adds support for it) of specified type in liters and percentage with progress bar. This will work with modded gases too.
You need to specify type of tanks like Hydrogen or Oxygen. You can only specify one type.
Type is from name of the tank type (whatever you see in G-menu). So if modded tank will be called "Soup Tank" then you can use "Soup" as type here to display only those tanks.
Note: This is not exactly true. It uses the name of the type of gas that is in the tank, but there is no easy way to find that out in the game (creator of the gas mod can tell you what it is).
Variant TanksV shows only exact volume filled and maximum volume.
Variant TanksP shows percentage with progress bar.
TanksX variant shows only percentage without progress bar.
TanksBar variant shows only progress bar with no text.
Arguments
First argument: name filter (mandatory)
Second argument: type filter (mandatory)
Examples
Tanks * Hydrogen
Tanks {G:Room 1} Hydrogen
Tanks * Oxygen
Command: Echo
Displays single line of text. Use this to type whatever you want between commands or just add empty lines.
Arguments
No arguments: empty line
Next arguments: text to be displayed
Examples
Echo
Echo MMaster's Automatic LCD
Echo Small;Power Small;Echo Large;Power Large
Command: Center
Displays single centered line of text. Use this to type centerd headers between commands.
Arguments
No arguments: empty line
Next arguments: text to be displayed centered
Examples
Center Centered Text
Center MMaster's Automatic LCD
Center Small Power;Power Small;Center Large Power;Power Large
Command: Right
Displays single line of text aligned to the right.
Arguments
No arguments: empty line
Next arguments: text to be displayed aligned to the right of LCD
Examples
Right This text will appear aligned to the right
Right MMaster's Automatic LCD
Command: HScroll
Displays single line of text slowly scrolling from Right to Left across the whole width of LCD. Use HScrollR to scroll from Left to Right.
If you want to have larger space between the end of the text and start of the repeated text you can add spaces to the end of the text.
Arguments
No arguments: no output
Next arguments: text to be displayed and scrolled horizontally
Examples
HScroll This text will scroll from right to left
HScrollR This text will scroll from left to right
Command: CustomData (NEW!)
Displays scrolling text read from Custom Data of other block.
This is very useful when using different mods / scripts that write something to Custom Data of block and you would like to append it to your Automatic LCDs displays.
Example: CustomData {Other Programmable Block} will append Custom Data contents of first Programmable Block named Other Programmable Block.
Takes no arguments except for name of block you wish to read the Custom Data from.
Command: TextLCD
Displays scrolling text read from other LCD.
This is very useful when using different mods / scripts that type something on LCD and you would like to append it to your Automatic LCDs displays. This way you can have one LCD hidden that will be used by your mod / script and use TextLCD command to read that text and write it to one of the Automatic LCDs. Example: TextLCD {Other LCD} will append contents of first LCD named Other LCD.
Takes no arguments except for name of the other LCD.
Command: Time [Center!]
Displays single line of text followed by current time.
You can use offset in hours to adjust time to your time zone like this:
Time-2 - shows current time -2 hours
Time+1 - shows current time +1 hour
Time+0.5 - shows current time +0.5 hours (30 minutes)
You can use TimeC to center the text. You can also combine it with offset e.g TimeC+2.
Arguments
No arguments: display only current time
Next arguments: text to be shown before the time
Examples
Time
Time MMaster's Text Panel Time:
Time+1 Time plus 1 hour:
TimeC Centered time:
TimeC+2 Centered time plus 1 hour:
Command: Date [Center!]
Displays single line of text followed by current date. Same as in time case you can offset it by hours so your date is switching at correct time. Like this:
Date-2 - offset by -2 hours
Date+0.5 - offset by 0.5 hours (30 minutes)
You can use DateC to display centered date. You can also combine it with offset eg: DateC+2.
Arguments
No arguments: display only current date
Next arguments: text to be shown before the date
Examples
Date
Date Current date:
Date+1 Date plus one hour:
DateC Centered date:
DateC-2 Centered date - 2 hours:
Command: DateTime
DateTime command can be used to display current date and time with custom format on single line.
You can offset the displayed time by number of hours by adding +1 or -1 or any number of hours you want to offset the displayed time and date in the same way as it works in Time command:
DateTime+2
You can center the text by using DateTimeC. You can also combine it: DateTimeC-2
Arguments
No arguments: displays date and time using default local short format.
Next arguments: specify format to display (look below for explanation)
Custom formats examples
Let's learn by example (explanation below):
Command
Display text
DateTime MM/dd/yyyy
08/22/2015
DateTime dddd, dd MMMM yyyy
Tuesday, 22 August 2015
DateTime dddd, dd MMMM yyyy HH:mm
Tuesday, 22 August 2015 06:30
DateTime dddd, dd MMMM yyyy hh:mm tt
Tuesday, 22 August 2015 06:30 AM
DateTime dddd, dd MMMM yyyy H:mm
Tuesday, 22 August 2015 6:30
DateTime dddd, dd MMMM yyyy h:mm tt
Tuesday, 22 August 2015 6:30 AM
DateTime dddd, dd MMMM yyyy HH:mm:ss
Tuesday, 22 August 2015 06:30:07
DateTime MM/dd/yyyy HH:mm
08/22/2015 06:30
DateTime MM/dd/yyyy hh:mm tt
08/22/2015 06:30 AM
DateTime MM/dd/yyyy H:mm
08/22/2015 6:30
DateTime MM/dd/yyyy h:mm tt
08/22/2015 6:30 AM
DateTime MM/dd/yyyy h:mm tt
08/22/2015 6:30 AM
DateTime MM/dd/yyyy h:mm tt
08/22/2015 6:30 AM
DateTime MM/dd/yyyy HH:mm:ss
08/22/2015 06:30:07
DateTime MMMM dd
August 22
DateTime MMMM dd
August 22
DateTime HH:mm
06:30
DateTime hh:mm tt
06:30 AM
DateTime H:mm
6:30
DateTime h:mm tt
6:30 AM
DateTime HH:mm:ss
06:30:07
DateTime dddd, dd MMMM yyyy HH:mm:ss
Tuesday, 22 August 2015 06:30:07
DateTime yyyy MMMM
2015 August
Custom formats
As you may have noticed from examples above some character combinations are substituted by parts of date and time and some are not.
If you would want to write message like:
Hi, the time is: 22:00
You could use this command (which would not work correctly):
DateTime Hi, the time is: H:mm
What would it actually show? Something like this:
22i, P10e Pi0e i49: 22:00
Why is that? Because some characters were replaced (you can find list of character combinations that are replaced in table below)
So how to get around it? You can use special character to mark what is not supposed to be replaced. So if we would like to fix our previous example we would do this:
DateTime \Hi, \t\he \ti\me i\s: H:mm
This command would show message we expected because we prefixed all characters, that would be otherwise replaced, with \
List of format character groups
d
Represents the day of the month as a number from 1 through 31. A single-digit day is formatted without a leading zero
dd
Represents the day of the month as a number from 01 through 31. A single-digit day is formatted with a leading zero
ddd
Represents the abbreviated name of the day of the week (Mon, Tues, Wed etc)
dddd
Represents the full name of the day of the week (Monday, Tuesday etc)
h
12-hour clock hour (e.g. 7)
hh
12-hour clock, with a leading 0 (e.g. 07)
H
24-hour clock hour (e.g. 19)
HH
24-hour clock hour, with a leading 0 (e.g. 19)
m
Minutes
mm
Minutes with a leading zero
M
Month number
MM
Month number with leading zero
MMM
Abbreviated Month Name (e.g. Dec)
MMMM
Full month name (e.g. December)
s
Seconds
ss
Seconds with leading zero
t
Abbreviated AM / PM (e.g. A or P)
tt
AM / PM (e.g. AM or PM
y
Year, no leading zero (e.g. 2001 would be 1)
yy
Year, leadin zero (e.g. 2001 would be 01)
yyy
Year, (e.g. 2001 would be 2001)
yyyy
Year, (e.g. 2001 would be 2001)
Command: Countdown
Countdown command is used to show days, hours, minutes and seconds remaining to specified date and time. It displays EXPIRED after the countdown ended.
You can align the output by using CountdownC to center and CountdownR to align text to the right.
Note that the time and date is game host time or whatever you see with DateTime command without any offset (format is different).
Arguments
You need to enter target date and time in the following format:
22:00 28.2.2015
It needs to be in that exact format in that exact order.
So first is hours in 24-hour format then : then minutes with a leading zero then space then day of month then . then month number then . and then full year
Examples
Countdown 22:00 31.12.2015
CountdownC 0:00 1.1.2016
CountdownR 11:30 24.12.2015
Command: Pos
Displays world position of the LCD panel on single line.
Use PosXYZ to show X,Y,Z on separate lines.
Use PosGPS to show position in GPS format.
Arguments
No arguments: displays location of LCD panel
First argument: displays location of first found block matching this name filter
Examples
Pos
PosXYZ
Pos {Small Reactor 1}
PosXYZ {Cockpit}
PosGPS {Cockpit}
Command: Altitude
Displays altitude of the ship above ground.
AltitudeSea displays altitude above sea level.
Takes no arguments.
Command: Speed
Shows current speed of ship in m/s.
SpeedKmh and SpeedMph to show speed in km/h or mph.
Arguments:
No arguments: displays current speed of ship
First argument: maximum speed in m/s (displays visual bar)
Examples:
Speed 100
Sets maximum speed to 100 m/s even if using SpeedKmh or SpeedMph variants!
So for 100 km/h you would need to set max to 100 / 3.6 = 28 m/s
Command: Accel
Shows current acceleration of ship.
Arguments:
No arguments: shows current acceleration in m/s2
First argument: maximum acceleration in m/s2 (displays visual bar)
Examples:
Accel 10
Shows acceleration with visual bar with max acceleration 10 m/s2
Command: Gravity
Displays natural, artificial and total gravitational acceleration (in m/s²).
If you want to display just one of the above you can use variants:
GravityNatural shows natural (planet) gravity.
GravityArtificial shows artificial gravity.
GravityTotal shows total gravity.
Takes no arguments.
Command: StopDistance & StopTime
StopDistance displays stopping distance of the ship based on highest recently measured decceleration of the ship.
StopTime displays time it will take the ship to stop.
StopDistanceBest and StopTimeBest shows values based on highest decceleration ever achieved by the ship. Only use this if your ship has balanced thrusters to all sides.
These values are estimates and will be most accurate during the breaking.
Takes no arguments.
Command: ShipMass
Displays total mass of the ship. Optionally it can also display it as percentage with progress bar if you specify maximum mass.
You can specify maximum mass by using arguments to the command. First argument specifies maximum mass value while second argument specifies metric unit prefix of the maximum mass such as k, M, G, T. Default prefix is k (as in kg). If you enter "1 M" it means 1Mg (1 ton).
Do not miss that there needs to be space between value and unit prefix.
ShipMassBase will show base mass of the ship without the items.
Arguments
No arguments: displays mass of the ship
First argument: maximum mass value (in kg)
Second argument: override metric unit prefix of max mass. (k, M, G, T, P, E, Z, Y)
Examples
Mass of whole ship:
ShipMass
Mass of whole ship with progress bar, 100kg maximum mass:
ShipMass 100
Mass of whole ship with progress bar, 10000kg (10 tons) maximum mass:
ShipMass 10000
Same as one above (10 tons max mass):
ShipMass 10 M
Percent of max mass of all items in all blocks without progress bar
1 000 000kg (1 000 tons) maximum mass:
ShipMassBase
Base mass of the ship without the mass of the items in containers and other blocks.
Command: Mass
Displays mass of items in selected blocks. Optionally it can also display it as percentage with progress bar if you specify maximum mass.
Note: If you want to see total mass of the ship you can use commands: ShipMass & ShipMassBase
You can specify maximum mass by using arguments to the command. Second argument specifies maximum mass value while third argument specifies metric unit prefix of the maximum mass such as k, M, G, T. Default prefix is k (as in kg). If you enter "1 M" it means 1Mg (1 ton).
Do not miss that there needs to be space between value and unit prefix.
Following only works if you specify maximum mass:
Use MassX to show only percentage without the progress bars or actual mass.
Use MassP to show only percentage and progress bars without exact mass.
Arguments
No arguments: all containers on ship/station
First argument: filters containers based on name
Second argument: maximum mass value (in kg)
Thrid argument: override metric unit prefix of max mass. (k, M, G, T, P, E, Z, Y)
Examples
Mass of all items in all blocks:
Mass
Mass of all items in all blocks with progress bar, 100kg maximum mass:
Mass * 100
Mass of all items in all blocks with progress bar, 10000kg (10 tons) maximum mass:
Mass * 10000
Same as one above (10 tons max mass):
Mass * 10 M
Percent of max mass of all items in all blocks without progress bar
1 000 000kg (1 000 tons) maximum mass:
MassX * 1 G
Percent of max mass of all items in all blocks with progress bar (without value)
2 000kg (2 tons) maximum mass:
MassP * 2000
Mass of items in specific containers:
Mass {Large Cargo Container 5}
Command: Occupied
Displays if first found ship control block (cockpit, remote control or cryo chamber) is occupied.
If you have multiple cockpits and/or remote controls and/or cryo chambers you should specify name filter so it displays status of block you want.
It doesn't display disconnected players in cryo chambers. Game tells the script that the chamber is empty when the player disconnects
Arguments
No arguments: first found ship control block on ship/station
First argument: filters based on name
Examples
Occupied
Occupied Cockpit
Occupied {Remote Control}
Occupied {Cryo Chamber 3}
Command: Dampeners
Shows if dampeners are turned on or off.
Takes no arguments.
Examples
Dampeners
Command: Distance
Shows distance of the specified block from the specified GPS waypoint.
Arguments
No arguments: shows warning about missing / invalid gps coordinates
First argument: filters block based on name to display distance from
Second argument: GPS waypoint as copied from in-game GPS UI
Examples
Distance {Merge Block} {GPS:Station Dock:222:333:444:}
Distance {Cockpit} {GPS:Name:111:222:333:}
Manual Scrolling
You can now disable the automatic scrolling on the LCDs and use manual scrolling with buttons.
First you need to add "!NOSCROLL" (without quotes) to the name of the LCD to stop it from scrolling automatically.
After that you can Run the programmable block that runs the script with arguments:
scrollUp {name of LCD} <number of lines>
or
scrollDown {name of LCD} <number of lines>
so for example running the programmable block with argument:
scrollDown {My LCD 1} 2
will scroll the text on the LCD named "My LCD 1" 2 lines down.
You can also add this to button panel and setup action on button to Run the programmable block with argument. It needs to be the same programmable block that runs the script that shows the text on the screen on that particular LCD.
Margins on left and right side of LCD
You can now add spaces on the left and right side of the LCD by adding
!MARGIN:<number of spaces> to the name of the LCD.
For example if you add
!MARGIN:3it will add 3 spaces on the left side and 3 spaces on the right side and the contents of the LCDs will be in between those spaces.
Monospace font
Script can now automatically detect the font on the LCD and adjust the display based on that.
2 fonts are supported: Debug and Monospace
If you use custom font scroll down to the bottom of script, then scroll a bit up until you find AddCharsSize lines. Monospace font name and size definition is above those.
Booting screens and LCD clear
This script now supports boot screens and clearing of all LCDs.
LCD clear function
When you Run the programmable block with argument "clear" (without quotes) it will clear all LCDs. You can use this to turn off your LCDs without having to actually turn them off where they would say "OFFLINE".
Example use of LCD clear:
Setup Timer block with following actions:
1. Run the LCDs programmable block with argument "clear"
2. Turn off the programmable block
Setup button to Trigger now the Timer block that you just created.
Setup 2nd button to turn on the programmable block
First button will shutdown all LCDs and stop executing the script.
Second button will boot up the script again.
LCDs boot screens
Unfortunately there is no easy way to find out that you turned off/on your ship so the script doesn't automatically display boot screens after turn the power sources off and on. You can however use the LCD clear function to reset the LCDs when you turn on your ship/station. There is also special "boot" argument to start the boot sequence whenever you need it. Just Run the programmable block with "boot" (without quotes) as argument.
Example use of LCD boot when you start ship / station with button:
Setup Timer block with following actions:
1. Run the LCDs programmable block with argument "clear"
2. Turn off the programmable block
3. Turn off your reactors / thrusters / whatever you need
Setup button to Trigger now the Timer block that you just created.
Setup Timer block with following actions:
1. Turn on your reactors / thrusters / whatever you need
2. Turn on the programmable block
Setup 2nd button to Trigger now the 2nd Timer block that you just created.
First button will shutdown all LCDs, stop executing the script and turn off your ship/station.
Second button will turn on your ship and boot up the script again.
If you are a bit more advanced, you can customize the boot screens:
To customize the boot texts (except for progress bar part) open the script in programmable block and scroll down a bit, where you will find this:
/* BOOT FRAMES
* Each @"<text>" marks single frame, add as many as you want each will be displayed for one second
* @"" is multiline string so you can write multiple lines
*/
@"
Initializing systems"
,
@"
Verifying connections"
,
@"
Loading commands"
/* END OF BOOT FRAMES */
Change the text inside @"" to whatever you want, remove some frames or add more. Don't miss that the texts need to be separated with comma (,).
You can disable initial automatic boot by changing
ENABLE_BOOT = true;
in script to:
ENABLE_BOOT = false;
Dedicated server setup
Automatic LCDs 2 is not a mod so you don't need to do anything in dedicated server setup to use it except for having enabled in-game scripts in your world.
Do not add Automatic LCDs 2 to your mod list or your dedicated server will not start!
Programmable blocks and in-game scripts are part of vanilla game and people can use in-game scripts that they write themselves or ones that they subscribed to in workshop. Server owners do not need to subscribe to the in-game scripts or add them to mod list (in fact they MUST NOT put it to mod list or their server won't start).
The only requirement is to have "Experimental mode" enabled in server options and in-game scripts enabled in world settings so programmable blocks are available and usable.
How to Translate?
It is now possible to easily translate the script to your own language. You need to only translate item names and messages at the bottom of the script.
Can you publish translated script?
Please do NOT publish it without first talking to me and getting my permission.
Generally I have these rules which we agreed on with other translators:
- Do NOT modify anything in the code. Only translate the messages and item names.
- Make sure you are willing to take care of the translation even after few months
- Translated script description needs to have link to the main script
- Add me as the contributor of your translated script
That's it. Once we agree and you have your translation ready I will properly credit you and add link to the translated script to this guide as well as main script page.
How to translate item names?
When you look into the script and scroll down a bit you will find item definitions that look like this:
Add("Ice", "Ore");
Add("Stone", "Ingot", 40000, "Gravel", "gravel");
Add("Iron", "Ingot", 300000);
As you can see only second one contains changed display name, but you can add your own to any of them. Let me show you how to translate those 3 items:
Add("Ice", "Ore", 0, "Lad");
Add("Stone", "Ingot", 40000, "Strk", "gravel");
Add("Gold", "Ingot", 20000, "Zlato", "gold", "goldalternative");
Add("Iron", "Ingot", 300000, "Zelezo");
On first line I added default quota 0 and then new display name of the item.
On second line I just changed "Gravel" to "Strk" (which is gravel in slovak language), but you can see there is one more gravel mentioned there. I recommend you don't change that one.
On 3rd line I just changed "Gold" to "Zlato" (which is gold in slovak language), but you can see there is also one more gold and also goldalternative mentioned there. I recommend you don't change those ones.
On 4th line there was already default quota set so I just added display name change which changes "Iron" to "Zelezo".
Do NOT change the first two strings or the script will not work correctly!
How to translate messages?
At the bottom of the script you will find list of all messages displayed by the script. They look like this:
// TRANSLATION STRINGS
// msg id, text
{ "A1", "EMPTY" }, // amount
{ "B1", "Booting up..." },
{ "C1", "count" },
{ "C2", "Cargo Used" },
{ "C3", "Invalid countdown format, use:" },
You can change the second string on the line to equivalent in your language, but do NOT change the first string. I also recommend you keep the text as short as possible.
For example:
{ "W9", "ON" },
Can be changed to:
{ "W9", "ZAPNUTE" },
but that would be too long and would not fit on display of most people. So instead you can use some abbreviation like:
{ "W9", "ZAP" },
How to keep your translation up-to-date with the main script?
This is why I've separated the messages from the main code so you don't need to walk through code to find what needs to be translated. When I update the main script you can just copy-paste the item lines and message lines from your old translated version to new script and just translate any new items/messages that were added in the update.
German, French, Spanish, Portuguese / Brazilian, Russian, Chinese Translations
German version
Thanks a lot to JD.Horx for translating:
Automatic LCDs 2 (German) [1.194]
Ein Workshop-Inhalt für Space Engineers
Von: JD.Horx
//////////////////// \\\\\\\\\\\\\\\\\\\\ UPDATE v.1.194 Kompatibel \\\\\\\\\\\\\\\\\\\\ //////////////////// Privater Link von DocGalaxy's Dropbox:...
French version
Thanks a lot to =SW42=Hydeki_ for translating:
Automatic LCDs 2 (Français)
Ein Workshop-Inhalt für Space Engineers
Von: Hydeki_
Bonjour, Voici la version française du script de MMaster que je me suis permis de traduire et publier avec son accord. http://steamcommunity.com/sharedfiles/filedetails/?id=822950976 Si vous rencontrez des soucis de...
Spanish version
Thanks a lot to Alpha Dragon for translating:
Automatic LCD 2 Traduccion Español 2021
Ein Workshop-Inhalt für Space Engineers
Von: Alpha Dragon
Hola a todos después de un largo tiempo que nadie actualizaba al español este Scipt (Automatic LCD 2) Me he cansado y lo he traducido.
Portuguese / Brazilian version
Thanks a lot to Arthur_Gamer_HD for translating:
Automatic LCDs 2 ptBR
Ein Workshop-Inhalt für Space Engineers
Von: Arthur
Todas as informações que você precisa saber sobre a sua nave ou estação, exibida em tempo real nos painéis LCD em qualquer jogo Vanila, Modded ou Server.
Russian version
Thanks a lot to AlERK for translating:
Automatic LCDs 2 Rus
Ein Workshop-Inhalt für Space Engineers
Von: ʍȺȳʑȝȐ
КРАТКОЕ ОПИСАНИЕ Всё, что вам когда-либо нужно будет знать о вашем корабле и станции, отображается в реальном времени на ЖК-панелях в любых ванильных играх, с модами и на серверах!
Chinese version
Thanks a lot to lengchen for translating:

Automatic LCDs 2 [Simplified Chinese]
Ein Workshop-Inhalt für Space Engineers
Von: lengchen
Simplified Chinese translation of Automatic LCDs 2 My gratitude to you for all @MMaster have done. The translated version is published with the author‘s permission.
Note: If you are experiencing errors on translated version of script please write to the script page of author of that translation. I can't update translations.
How to add modded items
When you look into the script and scroll down a bit you will find item definitions that look like this:
Add("Ice", "Ore");
Add("Stone", "Ingot", 40000, "Gravel", "gravel");
Add("Iron", "Ingot", 300000);
At the bottom of that list of Add lines there are few examples of modded items:
// MODDED ITEMS
// (subType, mainType, quota, display name, short name, alt. short name, used)
// * if used is true, item will be shown in inventory even for 0 items
// * if used is false, item will be used only for display name and short name
// AzimuthSupercharger
Add("AzimuthSupercharger", "Component", 1600, "Supercharger", "supercharger", "", false);
Arguments
First argument is item subType (you need to get this from the mod author)
2nd is item type (you need to get this from the mod author)
3rd is default quota
4th is name of the item you want displayed on LCD
5th is short name that you want to use in commands like "Inventory * +shortname"
6th is alternative short name
Last argument is true or false:
- if true - item will be shown in inventory even for 0 items
- if false - item will not be shown unless it is already in specified inventory
Order is important!
In order for the script to work properly in all cases Items of one item type should be together.
This means that if you plan to add Ore item you should add it after last Ore item in the list *NOT* at the end of the list. Same for ingots, etc.
Tips & Tricks (SlowMode!)
You HAVE to RECOMPILE after changing following values.
How to use LCDs that are connected using rotors, pistons or connectors?
By default the script only updates LCDs that are part of the same grid as programmable block. First, I do recommend reading about 'Same grid filtering' in separate section of this guide.
You can change this behavior by changing LCD_TAG from "T:[LCD]" to "[LCD]".
Read 'What is LCD_TAG?' section to learn more about LCD_TAG.
How to slow down the script?
SlowMode setting can considerably slow down the script (4-5 times less processing per second).
Add line "SlowMode = true" (without quotes) to the Custom Data of the programmable block to enable slow mode.
- You need to click Recompile in programmable block control panel for the change to take effect.
If you already use Custom Data to display stuff on Programmable block screens:
Add the line to the beginning of Custom Data and separate it from the commands by using line --- eg:
LCD_TAG = [LCD]
SlowMode = true
---
@0 AutoLCD
Echo "Text on main screen"
@1 AutoLCD
Echo "Text on keyboard screen"
or
At the top of the script (right under LCD_TAG setting) you can set SlowMode = true; to enable slow mode.
Changing the scroll speed
You can change the number of lines that the script scrolls in single step.
Add line "SCROLL_LINES = 2" (without quotes) to the Custom Data of the programmable block to make the script scroll 2 lines in one step instead of default 1.
- You need to click Recompile in programmable block control panel for the change to take effect.
If you already use Custom Data to display stuff on Programmable block screens:
Add the line to the beginning of Custom Data and separate it from the commands by using line --- eg:
LCD_TAG = [LCD]
SlowMode = true
SCROLL_LINES = 2
---
@0 AutoLCD
Echo "Text on main screen"
@1 AutoLCD
Echo "Text on keyboard screen"
or
You can change line "SCROLL_LINES = 1;" at the top of the script to "SCROLL_LINES = 2;"
How to stop the script from changing Content Type of the panels?
You can add line "SKIP_CONTENT_TYPE = true" (without quotes) to Custom Data of the programmable block to disable automatic panel content type change.
- You need to click Recompile in programmable block control panel for the change to take effect.
If you already use Custom Data to display stuff on Programmable block screens:
Add the line to the beginning of Custom Data and separate it from the commands by using line --- eg:
LCD_TAG = [LCD]
SlowMode = true
SKIP_CONTENT_TYPE = true
---
@0 AutoLCD
Echo "Text on main screen"
@1 AutoLCD
Echo "Text on keyboard screen"
or
You can change line "SKIP_CONTENT_TYPE = false;" at the top of the script to "SKIP_CONTENT_TYPE = true;"
Do you want to change some text that the script says?
You need script to not show "Total Output" but only "Total"? Or is there anything else that doesn't fit your needs? You can change anything the script says at the bottom of the script. Look at 'How to Translate?' section to learn how to make the script say what you need.
You can use comments in Custom Data like this:
// Following line will display Power
Power
// This one will display Cargo
Cargo
Line that starts with // is ignored by the script. But // in middle of the command is not considered comment!
Compatibility with other scripts
Keen has added MyIni format that scripters can use to parse Custom Data. This was added explicitly to make life easier for scripters when they need to use Custom Data and share it with other scripts. This was written by Malware (the creator of MDK framework for Space Engineers in-game scripting and father of Programmable Block) and I've been discussing with him how to make it compatible with Automatic LCDs without people having to learn new syntax so he came up with great solution.
Scripts can use the MyIni format which looks something like this:
[Script 1]
variable=value
variable2=value2
[Script 2]
variable=value3
variable4=value4
If people also want to write Automatic LCDs commands to the same block where the Custom Data is already used by script that uses MyIni format then they can simply add 3 dashes on its own line and continue with Automatic LCDs commands like this:
[Script 1]
variable=value
variable2=value2
[Script 2]
variable=value3
variable4=value4
---
@0 AutoLCD
Echo This will be completely ignored by the MyIni parser.
Anything under the --- is ignored by the MyIni parser that other scripts use. Anything before the --- is completely ignored by the Automatic LCDs so this way Automatic LCDs can share Custom Data with other scripts and coexist peacefully
NOTE: Some scripts overwrite the Custom Data and if you already have some Automatic LCDs commands there they will remove them. If those scripts support the MyIni format then you can write your commands like this to make them not remove the commands (or set them up first and then use the format like explained above):
[AutoLCD]
---
@0 AutoLCD
Echo This will be completely ignored by the MyIni parser.
FAQ
Can I change the rate of script updates?
This script doesn't work like other scripts on the workshop. Script updates dynamically as it needs and time between updates of most of the commands is several seconds depending on complexity of the command. There is not a single update time you can modify because the script doesn't work that way. The script automatically limits itself and spreads the calculations over time to have minimal impact on the game performance. That's why the more commands you use the longer it will take to update all of them. Unfortunately even if I figured out some way to let you configure update rates, I just can't leave the update rates configurable for people, because the script would have very bad impact on game with high refresh rates and many people would not realize that - trust me, we've been there.
I'm also in contact with developers and other modders making sure the script is as optimized as possible.
You can have 100 scripts running on your server with 1.0 sim speed. If you would like to see the performance test it starts at 1:56 of the showcase video which is the first one in the screenshots on the main script page or here:
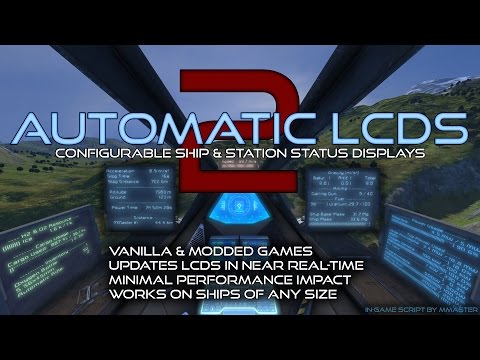
YouTube™-Video: Space Engineers - Automatic LCDs 2 Showcase / Teaser
Aufrufe: 7,548
Showcase of the complete rewrite of Automatic LCDs I've been working on for last year: http://steamcommunity.com/sharedfiles/filedetails/?id=822950976 I hope you will like the video.
The game had problems rendering so many ships and my FPS was tanking, but sim speed was still at 1.0.
I will always try to make sure that the script performs as well as possible while giving you good enough refresh rates. Unfortunately it can't be completely real time, because the impact would be just too huge.
Programmable Block Edit button is greyed out. What should I do?
You need to enable in-game scripts in Advanced World settings. You can find them on Load screen, when you select your save and click Edit Settings button, then Advanced button and scroll down you will find lots of check boxes, one of them says In-game scripts - make sure it is enabled.
Troubleshooting
Read this if you have trouble.
READ THIS: Programmable blocks and in-game scripts are now in "Experimental mode" in game that you need to turn on in game options.
Also don't forget to enable in-game scripts in advanced world settings.
You don't have the 'Edit' button in programmable block?
Read the big blue text above and then the smaller text below it
Adding !LINK or changing something does not take effect even though script properly works
Try to recompile the script in programmable block. Some things are cached while the script is running and for very few special cases your changes won't be detected until you recompile the script.
*** Check your ownership ***
Always make sure that the programmable block and LCDs have the same ownership as the blocks you want to show on the LCDs. I highly recommend you own all the blocks unless you know how ownership works. Just open the control panel, select one of the blocks on your ship, press CTRL+A and change the ownership on the right side to 'Me'.
Programmable block gets damaged in multiplayer?
Script limiter plugin used on some dedicated servers is "burning down" the PB.
Script limiter is unreliable and dependent on things outside of the game (like other processes eating the CPU etc). Admins use it because its the only way to stop scripts from slowing down the server unfortunately in the process it kills even innocent scripts when the server is overloaded.
I can't stop it. Its techinically impossible because of how the script limiter works. The script is independent on number of screens or number of commands .. it always uses the same number of instructions and instead slows down the updates of the screens.
Technical details: Script limiter counts real time it took script to execute. Because of how computers and operating systems work the real time it takes to execute some code is dependent on other things running on the computer. So if one thing is using a lot of CPU then other things will take longer to complete. This is why even scripts that do almost nothing can take a lot of time to complete if the computer is overloaded by for example doing backups, scanning for viruses, calculating the answer to ultimate question, etc. Because the scripts get less CPU time it takes much longer to complete even simple tasks. This is why its almost impossible to make the script survive script limiter actions if the server is overloaded from doing other stuff many times even outside of the SE game itself. -
Laden…


